This is an old revision of the document!
Table of Contents
Accessing the AI
This very much depends on how you access the default interface.
If you use localhost:8998/ then just use localhost:8998/ai2/
If you use an ip address, just continue to use the ip address and add /ai2/ at the end. E.g. <ip address>:8998/ai2/
Please note the trailing /.
The AI will load showing the AI dashboard. At the top of the dashboard will be the Alarms Panel and, on Davis® weather stations a Davis Status panel. Both of these can be hidden using the button(s) at the top of the screen. Once hidden, they will stay hidden until you opt to view them again. Also included with the buttons is one to popup an Almanac showing sun and moon times for the current day.
The main content of the page is very similar to the default Interface.
The Diffences
The most visible difference you will see is the menu - it is much more compact. The screenshot below shows this.

All the same menu options are available although some have slightly different wording. The 'Report' have been moved to the right and the default Dashboard option is now part of the 'Utilities' menu.
The header now includes the site location1) above the location data, i.e., latitude, longitude and height. I have done this so that this information is on every page.
However it does offer some enhancements. Please see the individual page detail using the links below:
Specific page changes
The Dashboard, the Weather data menu, the Extra Sensors menu, Logs, Settings, Edit and Utilities.
AI settings
One major feature of the AI is that you can change the way it looks. There are two levels to this. You can simply change the colour scheme used or you can change the order of items displayed on many of the pages. This will be of particular advantage when you only have some of the ‘extra sensors’ that are available and don’t want to have to scroll down a page to see them. It also enables you to prioritize which set of readings are at the top of the page.
Level 1 - the Theme
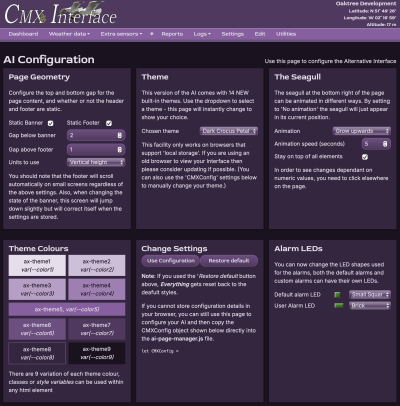
Navigating to the AI Settings page will display the AI Configuration screen (shown):
Here you can change the header and footer ‘fixed’ status. They can be made to scroll with the page if you prefer.
You can also change the gap between them and the main body content.
Next, you can select any of the 23+ schemes to see which you prefer. Make sure you opt to use your chosen scheme.
There is also the option to animate the seagull should you wish or make it sit behind other elements on the page.
The latest version of the AI also enables you to change the LED shapes used for the standard alarms and the user alarms.
The screenshot shown is using the 'Dark Crocus Petal' theme.

