Table of Contents
Editing the Layout of Panels
 Under the design of the AI just about every page can be re-arranged without resorting to cutting and pasting sections of HTML code. This means that page layout can change as your weather station develops and new sensors / features are added. It also means that if you are not happy with the layout I have used you can change1) it with just a few simple steps.
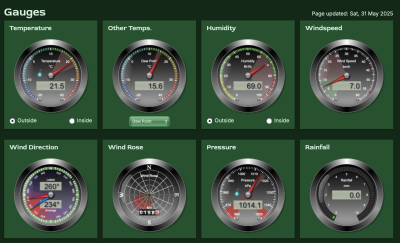
Show is the top of the Gauges page showing the default layout on a wide screen. Each panel has a css style attached to it, which by default is order:1;. When your browser encounters this it looks for other panels with an order number. If they are the same, then the browser displays the page in the order that it has been coded. As they are all order:1; all panels appear as I have coded them.
 92	<div class="ax-column4 ax-fixedwidth">
 93	  <!--	Panel 1 / column 1	-->
 94	  <div class="w3-card ax-theme8 w3-center" style="order:1;">
 95	    <div class="ax-titleBar">
 96	      <h4>Temperature</h4>
 97	    </div>
 98	    <div id="tip_0" class="gauge">
 99	      <canvas id="canvas_temp" class="ax-gaugeStandard"></canvas>
100		</div>
101	      <div class="ax-titleBar">
102		<div><input id="rad_temp1" class="w3-radio" type="radio" name="rad_temp" value="out" aria-label="Outside temperature" onclick="gauges.doTemp(this);" checked ><label id="lab_temp1" for="rad_temp1">Outside</label></div>
103		<div><input id="rad_temp2" class="w3-radio" type="radio" name="rad_temp" value="in" aria-label="Inside temperature" onclick="gauges.doTemp(this);"><label id="lab_temp2" for="rad_temp2">Inside</label></div>
104	      </div>
105	      <div class="ax-btnBar w3-hide">
106		<button id="Outside" class="w3-btn ax-theme9">Outside</button><button id="Inside" class="w3-btn ax-theme9">inside</button>
107	      </div>
108	    </div>
109	    <!--	Panel 2 / column 2	-->
110	    <div class="w3-card ax-theme8 w3-center" style="order:1;">
111	      <div class="ax-titleBar">
112		<h4>Other Temps.</h4>
113		</div>
114		  <div id="tip_1" class="gauge">
115		    <canvas id="canvas_dew" class="ax-gaugeStandard"></canvas>
116		  </div>
117		  <div class="ax-btnBar" style="justify-content: center;">
118		    <select id="rad_dew" class="w3-select ax-btn-gradient-up w3-small" aria-label="Select for alternative temperature" onchange="gauges.doDew(this);">
119		      <option id="lab_dew1" value="dew" selected="selected">Dew Point</option>
120		      <option id="lab_dew6" value="feel">Feels Like</option>
121		      <option id="lab_dew2" value="app">Apparent</option>
122		      <option id="lab_dew3" value="wnd">Wind Chill</option>
123		      <option id="lab_dew4" value="hea">Heat Index</option>
124		      <option id="lab_dew5" value="hum">Humidex</option>
125	            </select>
126		  </div>
127		</div>
The above snippet of code from the gauges page shows lines 92 to 127 which code the first two gauges.
On lines 94 and 110 can be seen divs with the style “order:1;”. If the first one on line 92 is changed to order:2 it will jump to the end of the gauges2).
Using the above information it is possible to rearrange any panel simply by giving it a different order number. But you need to remember…
- Order numbers create an ascending numerically ordered set of panels
- Order numbers can be negative
- Panels with the same order number will always be displayed in the order they have been coded.
Changing the number of Columns
In the above code the very first line 92 has a div has a class ax-column4. This class dictates how many columns will attempt to be displayed3). There are six available column classes - ax-column1 to ax-column6.
Simply by changing this class will re-adjust the number of columns used. HOWEVER, this is bound to have an effect on tabular layouts. You may well find that text gets wrapped inconveniently. This may not be immediately obvious especially when dates are displayed as month and day names vary considerably in length.
Breaking the Column Layout
Again looking at line 92 you will see that it also has a class ax-fixedwidth. This forces all panels to obey the assigned column layout, I.e., it will always try to make panels the same width regardless whether there are enough panels for the selected layout. Any orphan panels will be centred within the page width.
If you remove this class - ax-fixedwidth, any 'orphan' panels will stretch sideways to fill the page width. If you don't want this to happen but want a specific panel to be wider, you can leave the class ax-fixedwidth but add a class ax-growX2 to your selected panel to make it span two panel widths. Note